Recently, digital marketing has become a must-have tactic to grow businesses of all sizes. Due to its reach, customisable features and sophisticated targeting, Google Ads is one of the most popular channels for digital marketing. In this article, I will take through you all the steps to correctly set up your very first Google Ads campaign and demonstrate how Google Ads to find and target new leads.
1. Set up a new Google account
First things first, log in to your Google account or register, if you don’t yet have one.
2. Set up a Google Ads account
Switch to expert mode
Once you log in to Google account, then simply go to ads.google.com and click Sign-In on the top right-hand side. Or, if you have an account existing, click on your google account and click the Grey Plus button to ‘Create New Account’.
You will then be directed to the page below and switch to “Expert Mode”.
3. Create an Account Without a Campaign
After you click it, you will go to a page asking you to ‘Choose a Campaign Goal’ to create a campaign. You just simply choose ‘Create an Account Without a Campaign’ on the bottom.
4. Confirm your business information
Next, you will be taken to a page asking three questions to ‘Confirm your business information’ (i.e. Billing country, Time Zone and Currency).
Once this is processed, you will be led to another page, and choose ‘Explore Your Account’ and go straight to the main account page. Keep in mind, after submitting this information, it cannot be changed, unless you restart the process and create a new account.
5. Congratulations! You have successfully created a new Google Ads account!
Now, it’s time to customise and maximise the potential for your account.
Create your first Google Ads campaign
The four, most popular types of campaigns are 1) Search, 2) Display, 3) Shopping, and 4) Video. Other campaign types include App Promotion, Discovery, and Smart. Each type of campaign has its own set-up requirements and needs for individual and/or creative input.
For example, with the Display Campaign, website banners are generated from the creative assets you supply. Alternatively, you can set up ‘Smart’ banners inside the Google Ads to elect for Google to automatically generate the visuals.
Starting with a Search Campaign – because it’s the most common and straightforward – I will demonstrate how to set up your Search Campaign.
1. Choose a campaign goal and campaign type
Google Ads Account > Overview Page > New Campaign
Once you are in your Google Ads account, on the Overview Page choose “New Campaign”. On the campaign page, click the Blue Plus button and then choose “New campaign” option.
Choosing your goals:
In the new campaign page, there are 6 different goal options and you can also create a campaign without a goal if you prefer. For Search campaigns, in particular, I recommend simply choosing “Leads” as a goal and then select “Search” as the campaign type.
Before you jump into the next step, it will ask you to select a way to reach your goal, such as website visits, phone calls etc.. Personally, I prefer just to skip that and click the “Continue” button because you can come back to it later. You can choose to add as many details as possible, however, Google Ads will ask for additional information like the website address.
2. General Settings
After clicking the Continue button, add your campaign name and decide the network where your ads will be appearing. There are also three more settings you can change, such as start and end date. Select when to launch this campaign and when it will end (this is important to avoid budget over-spending).
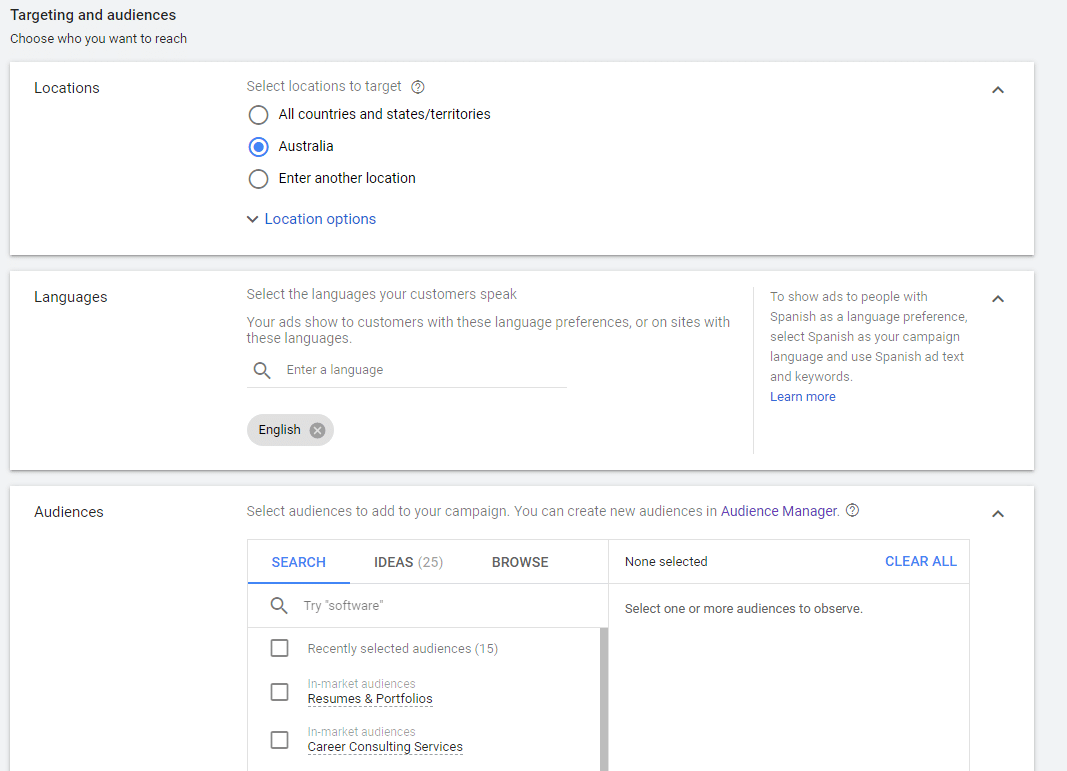
3. Targeting and Selecting Audiences
In this section, you will be able to choose your Target Location, Languages, and also your Target Audience, such as In-Market Audience.
4. Budget and bidding
Here, you can decide your daily Budget and Bidding Strategy. Also, there are three more settings you can change 1) Conversion Tracking, 2) Ad Schedule, and 3) Ad Rotation.
5. Ad Extensions
You can set up your Ad Extensions here, however, I personally prefer to set it up after the new campaign is set up. Either method works, just need to choose the way you prefer. Once it’s all done and you can click the “Save and Continue” button to finish all the campaign settings. With all the settings, you can always come back to make the changes so you don’t need to worry about if you choose the wrong one.
There you go, we have your brand new Google Ads Account and Campaign set up! The next step is much more specific to your business and industry so, we won’t include that in this blog.
One last step: create new ad groups and add keywords with some appealing ad texts, then your new digital marketing campaign is ready to launch! Or alternatively, if you are needing some tips and guidance ask the team – this is our expertise.


Leave a Reply